
티스토리 뷰
이번에 랩탑을 포맷하면서 개발환경을 조금 변경해봤습니다.
기존에는 vscode(JS), visual studio(c++), pycharm(python)으로 각 언어마다 모든 ide를 사용했었는데
이번에 vscode로 모든 언어를 사용할 수 있도록 변경하면서 변경 방법을 공유하고자 합니다.
먼저 c++ 환경부터 알아보겠습니다.
먼저 아래링크에서 컴파일러를 다운받아줍니다.
https://sourceforge.net/projects/mingw/

다운받은 파일로 설치를 진행합니다.
설치 진행 중 다른 체크박스들은 default로 두고 아래 화면이 나오면 다음과 같이 체크박스를 선택해줍니다.
체크박스는 마우스 오른쪽클릭 후 Mark for Installation을 클릭하면 됩니다.

체크완료 후 상단바의 Installation -> Apply Changes -> Apply 로 적용해줍니다.


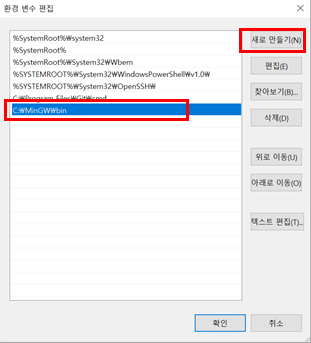
설치를 완료하고 나면 환경변수를 설정해야 합니다.
시스템 환경 변수 편집 -> 환경 변수


새로 만들기 를 클릭하여 C:\MinGW\bin 경로를 추가해줍니다.
환경변수를 추가하고나면 vscode에서 extension을 설치해줍니다.
왼쪽 사이드바에서 extension 탭(왼쪽 빨간박스)을 클릭하고 C/C++ 검색 후 Install 버튼을 눌러 설치해줍니다.

이제 간단한 cpp 파일을 만들어줍니다.

Ctrl + Shift + b 를 누르면 아래와 같이 뜹니다. C/C++: g++.exe build active file의 톱니바퀴 버튼을 클릭하면

tasks.json 파일이 생성됩니다.

tasks.json 을 아래 코드로 변경해줍니다.
{
    "version": "2.0.0",
    "runner": "terminal",
    "type": "shell",
    "echoCommand": true,
    "presentation" : { "reveal": "always" },
    "tasks": [
          {
            "label": "save and compile for C++",
            "command": "g++",
            "args": [
                "${file}",
                "-o",
                "${fileDirname}/${fileBasenameNoExtension}"
            ],
            "group": "build",
            "problemMatcher": {
                "fileLocation": [
                    "relative",
                    "${workspaceRoot}"
                ],
                "pattern": {
                    "regexp": "^(.*):(\\d+):(\\d+):\\s+(warning error):\\s+(.*)$",
                    "file": 1,
                    "line": 2,
                    "column": 3,
                    "severity": 4,
                    "message": 5
                }
            }
        },
        {
            "label": "save and compile for C",
            "command": "gcc",
            "args": [
                "${file}",
                "-o",
                "${fileDirname}/${fileBasenameNoExtension}"
            ],
            "group": "build",
            "problemMatcher": {
                "fileLocation": [
                    "relative",
                    "${workspaceRoot}"
                ],
                "pattern": {
                    // The regular expression.
                   //Example to match: helloWorld.c:5:3: warning: implicit declaration of function 'prinft'
                    "regexp": "^(.*):(\\d+):(\\d+):\\s+(warning error):\\s+(.*)$",
                    "file": 1,
                    "line": 2,
                    "column": 3,
                    "severity": 4,
                    "message": 5
                }
            }
        },
        {
            "label": "execute",
            "command": "cmd",
            "group": "test",
            "args": [
                "/C", "${fileDirname}\\${fileBasenameNoExtension}"
            ]

        }
    ]
}
다음으로 상단탭에 File -> Preferences -> Keyboard Shortcuts 를 클릭합니다.

Keyboard Shortcuts 가 나옵니다.
아래의 빨간 박스 부분을 클릭하면 keybindings.json 파일이 뜹니다.

keybindings.json 파일을 아래 코드로 변경해줍니다.
[
    {
        "key": "ctrl+alt+c",
        "command": "workbench.action.tasks.test"
    }
]
다시 cpp파일로 돌아와서 Ctrl + Shift + b를 누르면 아래와 같이 뜹니다.
save and compile for C++ 을 선택해줍니다.

.exe 파일이 생성된걸 볼 수 있습니다.

Ctrl + Alt + c를 누르고 아래의 execute을 클릭하면

아래 터미널에서 성공적으로 Hello World!가 출력되는 것을 확인할 수 있습니다.

'Development > 개발환경' 카테고리의 다른 글
| Github에 SSH key 등록하기 (0) | 2020.08.03 |
|---|---|
| [Windows] vscode에 python 환경 구축하기 (0) | 2020.08.02 |
| 우분투 노트북 덮개 닫아도 대기모드에 진입하지 않게 설정하기 (1) | 2020.01.14 |
| vim 줄번호, 들여쓰기 설정 (0) | 2020.01.13 |
| 안쓰는 노트북 우분투 서버로 구축하기 (0) | 2020.01.13 |
- Total
- Today
- Yesterday
- Django
- 팰린드롬 구하기
- 분할정복
- 종만북
- import
- 하둡
- 배열과 문자열
- 스파크
- 백준
- 삼각형 위의 최대 경로
- C++
- hive
- 알고스팟
- 합친 lis
- python
- pyspark
- 2225
- 출전 순서 정하기
- 하이브
- microwaving lunch boxes
- 두니발 박사의 탈옥
- Hadoop
- 완전탐색
- 코딩인터뷰 완전분석
- HDFS
- 외발 뛰기
- Jaeha's Safe
- HiveQL
- Sqoop
- 삼각형 위의 최대 경로 수 세기
| 일 | 월 | 화 | 수 | 목 | 금 | 토 |
|---|---|---|---|---|---|---|
| 1 | 2 | 3 | ||||
| 4 | 5 | 6 | 7 | 8 | 9 | 10 |
| 11 | 12 | 13 | 14 | 15 | 16 | 17 |
| 18 | 19 | 20 | 21 | 22 | 23 | 24 |
| 25 | 26 | 27 | 28 | 29 | 30 | 31 |